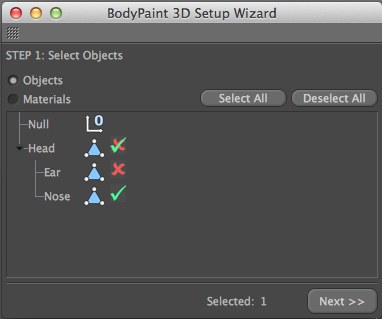
Step 1: Selecting an Object

Select all objects or materials that should be modified using the Paint Setup Wizard. All objects / materials with a check mark next to them will be included by the Paint Setup Wizard. Click on the check mark to change an element’s status. Objects to which no material can be assigned (NULL objects, cameras, etc.) will have a semi-transparent check mark or cross next to them if they have Child objects onto which can be painted.
A semi-transparent check mark or cross means the object itself cannot be painted on but its children can (for example, if the Parent is a camera, you will not be able to paint on it because it has no surfaces).
A combined check mark and cross means the object has some children which are selected, and some which are not. Click the parent’s check mark/cross to set the children all to the parent’s status.
In the bottom part of the dialog, you will see information on how many paintable objects are selected.
If this option is enabled, all objects in the scene are listed. Select each object that you want to paint on.
Enable this option to list all the materials in the scene which already exist. Here you can select which materials will be considered by the Paint Setup Wizard.
Selects or deselects all geometric objects / materials (those with a cross next to them).
Click this button to proceed to Step 2.