Timeline Motion Mode
Cinema 4D R11 has a new Timeline mode - the Motion Mode. The Motion Mode is specifically designed for working with the Motion System - managing Motion Sources, placing and layering Motion Clips on Motion Layers, and mixing Motion and Animation Layers.
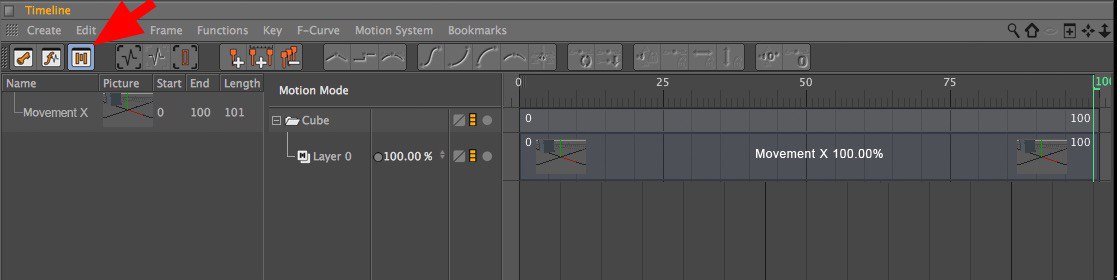
You can switch Motion Modes by clicking on the Motion Mode icon at the top right of the Timeline next to the Key and F-Curve Mode icons. Alternatively you can switch modes via the Timeline’s "View" menu.
The Motion Source window is located at the far left of the Timeline. This window displays all Motion Sources currently contained in the current project. Clicking on the small arrow next to a Motion Source will open its hierarchy. Motion Sources can also be grouped for a better overview.
All values shown here, i.e., Name, Start, End and Length can be modified by double-clicking on them. If you used a movie file to create the image ("Picture" column) or enabled the Create Picture option in the "Add Motion Clip … " dialog window when creating the Motion Source, double-clicking the image will play the animation in the Motion Source window.
The context menu is very important for the Motion Source window. It contains commands that can only be accessed through them.
The Motion Source window can be hidden or unhidden as necessary by clicking on the Motion System icon with the white outline at the far right of the Timeline.
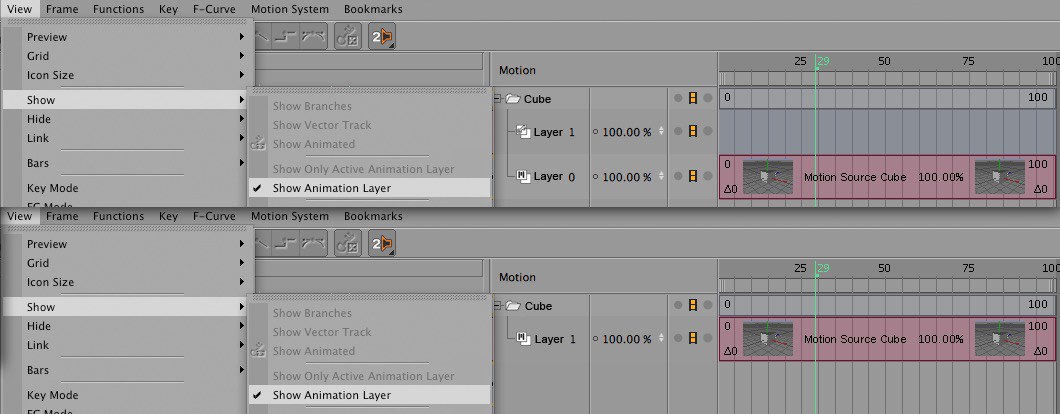
The Motion window is located to the right of the Motion Source window. This window displays Motion and Animation Layers for each Motion System tag contained in the current project. In the Timeline’s View / Show menu you can also define if Animation Layers should also be displayed.
Each folder in the Motion window represents an object with a Motion System tag. If a Motion Source is dragged from the Motion window onto one of these folders, a new Motion Layer will automatically be created for that Motion System tag. A Motion Clip will be created on this Motion Layer that is linked with the corresponding Motion Source. The Motion Clip will be scaled to the length of the project in the Timeline. If, on the other hand, you drag a Motion Source onto an existing Motion Layer, a Motion Clip will be created that matches the length of that Motion Layer.
The order of the Motion Layers can be easily modified by clicking on its name and dragging it vertically to another position. If you simultaneously press the
To the right of each name is the layer value. This value represents the amount of influence that layer has at that time in the animation. This value can also be animated. A Keyframe can be created by
As soon as a layer value has been animated a small triangle will appear next to the layer name. Clicking on this triangle will open an F-Curve display for that layer value. You can also display this F-Curve by activating the corresponding menu item in the Motion System / Motion View … dialog window.
A layer can be renamed by double-clicking on its current name in the Motion window. The same can be done with the name of the Motion System tag next to the folder icon. These modifications will also appear in the Object Manager and wherever else the name(s) appear(s).
To the right of the Motion window is the actual Timeline window. This is where Motion Clips can be added to Motion Layers, moved, scaled or blended. Animated regions of Animation Layers are displayed in gray. These regions cannot be moved or otherwise modified here - modification of animations on Animation Layers must be done in Dope Sheet Mode.
However, numerous modification possibilities are available for Motion Clips. As we already stated, a Motion Source can be dragged into an empty region of an Animation Layer to create a new Motion Clip. If a Motion Source is dragged onto an existing Motion Clip, this Motion Source will be assigned to that Motion Clip.

Click on the center of the Motion Clip and drag it to a different location in the Timeline. A Motion Clip can also be moved over another to create a transition between two Motion Clips.

Simultaneously press the
Simultaneously press the
Simultaneously press the
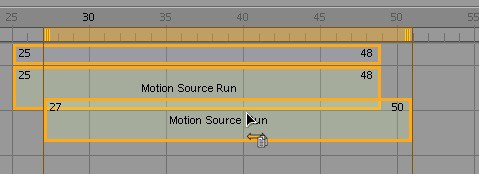
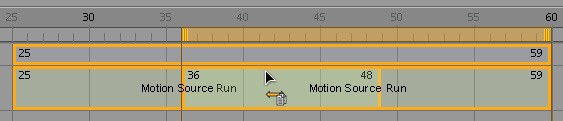
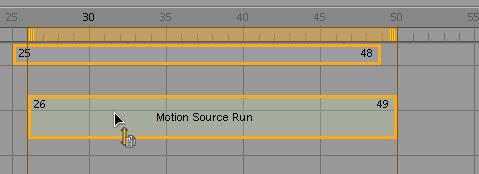
Once a Motion Clip has been selected in the Timeline a orange bar will appear at the top of the Timeline window, as when Keys are selected in Dope Sheet Mode. As with Keys, this bar can be used to move a Motion Clip when grabbed in the center or to scale a Motion Clip when grabbed at one end. The entire Motion Clip (or multiple Motion Clips), including any loops, will be scaled.
If a Motion Clip contains no loops, the same result can be achieved by dragging either end of the Motion Clip. The behavior is different, though, if the Motion Clip contains loops: If you drag at the start of the Motion Clip its length will be scaled and the loops will be scaled proportionally to the Motion Clip’s new length. If you drag at the end of the Motion Clip the number of loops can be changed interactively without changing the length of the Motion Clip itself.
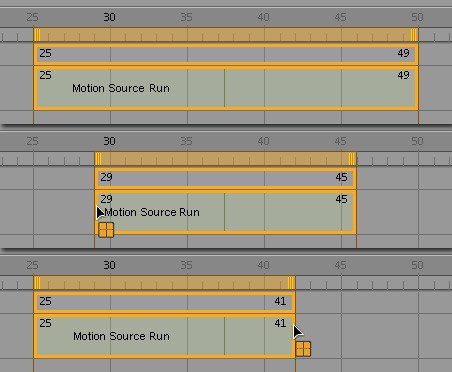
If the Trim option is enabled in the Motion System’s Motion View … dialog you can also trim the selected Motion Clip interactively by Ctrl+clicking either end of the Motion Clip.

Here also you can double-click on a Motion Clip to modify any Motion Clip value. Depending on the option(s) enabled in the Motion View … window you can, for example, modify the start or end frame, the overall length or the name of the Motion Clip or the Motion Source linked to it.
In Motion Mode, just as you can in the Key and F-Curve mode, you can drag an object from the Object Manager into the Timeline in order to view only this object. All other objects will be hidden. However, the Motion Mode has its own unique feature: Since only objects with a Motion System tag are displayed here, any object dragged into the Timeline in this manner will automatically be assigned a Motion System tag if it did not already have one.