How to Use the Browser

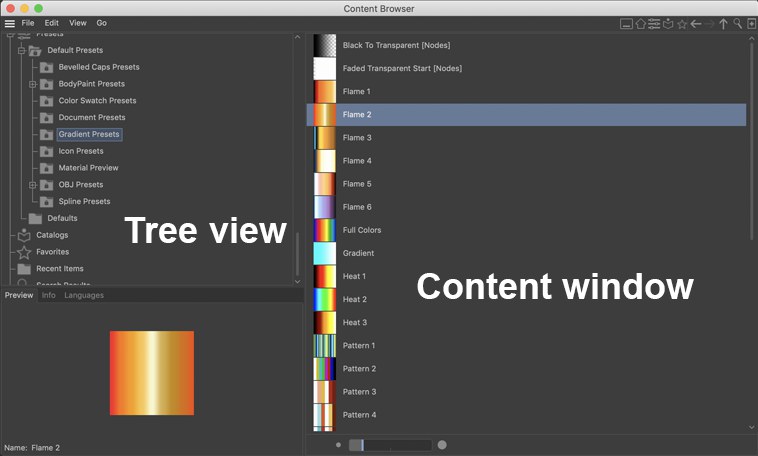
At the top left of the Content Browser you will see the directory tree view. In addition to your computer’s hard drive(s), Cinema 4D-specific directories are listed, with which you can manage presets and catalogs. In addition to the default Presets and Catalogs directories you will find the following folders:
- Recent Items: Every preset or file that was selected during a session will be listed here. This list is deleted when the Cinema 4D session is ended.
- If Cinema 4D is run on a Windows system an additional network directory will be created for the Content Browser which will list all network directories.
- Favorites: Any directory can be defined as a favorites directory. These will then be included in the Favorites directory. This can be very practical when always working in the same directory since you can jump directly to the corresponding Favorites directory using the corresponding Go command.
- Search Results: All search results from the Search function will be listed here, arranged in subfolders which, in turn, will be named according to the time of day and type of search. This list is deleted when the Cinema 4D session is ended.
You can add your own folders via File / New Folder, wherever you deem necessary,
The content of the selected folder will be displayed in the content window at the right of the Content Browser. When you select an item in this content window, its preview image will be displayed in the Preview window at the bottom left of the Content Browser. Multiple selections are possible (a list of the elements selected will be displayed in the preview window and the info window will display a list of file types and their count). The following methods can be used to select items:
- Drag the Rectangle Selection Tool over the object(s) you wish to select.
- Simply click on an item.
- Use
Ctrl/Cmd to select or deselect additional items. - Use
Shift to select a block of items.
Double clicking on a given element will initiate an action suitable for that particular file type, i.e., the item will either be opened directly in Cinema 4D or in an applicable external application (the application your operating system uses to open such a file by default, e.g., sound files). Files can be dragged from the Finder (macOS) or Desktop/Explorer (Windows) into the Content Browser. The corresponding folder and, if applicable, subfolders will be opened in the browser view, and the file in question will be displayed.
Right-clicking on an item will open a menu with the following options:
- Tree View: Displays or hides the tree view (hierarchical directory view)
- Open: Opens the item, if it is a scene file, preset, etc., in Cinema 4D.
- Open in New Browser: The selected directory will be opened in a new Content Browser.
- Open in BodyPaint 3D: Loads a given image into the texture view.
- Add to Favorites: Currently selected items will be added to the Favorites directory.
- Merge: Loads the selected item into the current scene.
- Show in Finder / Show in Explorer: Opens the Finder/Explorer and the item, including any subfolders, selected will be displayed.
- Open in Finder/Open in Explorer: If you right-click on a directory, the contents will be displayed in the Finder/Explorer. If you right-click on a file, e.g., a JPEG image, this file will be opened in the application to which it is linked.
- Rename: Renames the selected item.
- Copy: Copies the file.
- Paste: Pastes the copied file. If a file with the same name already exists in the target directory, a number will be added to the name of the file pasted, e.g., 1.
- Set Preview: Some presets, e.g., those of render settings, use the same icon. Use this option to assign your own icons (as square as possible in shape).
- New Folder: Adds a new folder in the current directory.
- View As: Lets you determine if items should be displayed as icons or a list.
- Single Click Open: If active, a given file can be opened with a single click. This function is browser-specific (!) and will be saved along with the layout (e.g., main menu: Window / Customization / Save as Startup Layout). Several browsers can be saved at once, along with their individual settings. This function can be useful when working with brush presets in BodyPaint 3D - where the brush can be switched with a single click.
- Create Preview: It may be necessary to manually create a preview of a given item, e.g., if you had to halt the generation of a preview for whatever reason.
- Only applies to macOS: All video formats readable by Cinema 4D can be played back in the preview window. If this doesn’t work right away, right-click on the video icon and select the "Create Preview" option.
- Update Texture Path: Copying, moving and renaming files, directories and libraries can lead to material or texture paths no longer being found when files are loaded into Cinema 4D. Selecting this command will ensure that textures and materials can be relocated.
- Delete: Deletes the selected item.
- Add To: Various catalogs will be listed. Select one and all selected items will be added to that catalog.
If you select Tree View (View / Tree View), the following additional options will be made available:
- Tree View: Switches back to the normal Content Browser mode.
- Up One Level: Switches to the next highest directory. (The directory icon at the top right has the same function).
- View As: Use this setting to define whether items will be displayed as icons or as a list.
Additionally available for catalog items:
- Change home directory: Here you can select a new home directory.
A preview of an item selected in the Content Browser’s content window will be displayed in the preview window at the bottom left of the Content Browser (known file types only).
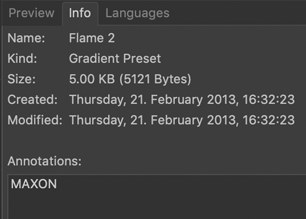
Click on the Info tab to see details pertaining to the selected item. By simply moving the cursor over a preview, its home directory will be displayed in the status bar. An Annotation field is also available in which comments about the selected item can be written. By the way, the Content Browser’s Search function also searches the contents of the Annotation field if the Annotations option is activated during the search.

When a catalog is selected, you can also change its home directory.
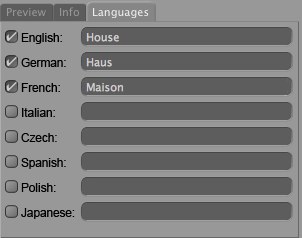
Presets have an additional tab with which the preset names for various languages can be defined (in the image below, only the languages installed are shown):

Simply enter the corresponding localized term. When you switch via Language to one of the languages for which you have defined a preset name this name will be displayed in the corresponding language.
At the top right of the Content Browser you will find a row of icons with the following functions:

From left to right:
- Go to the desktop
- Go to Home Directory
- Go to Presets folder
- Go to Catalogs folder
- Go to Favorites folder
- Go Back
- Go Forward (to a previously viewed directory)
- Go to next higher folder in the hierarchy
- Open Search function
- Open new Content Browser
At the very bottom of the Content Browser you will see the following slider:

The animated circular icon to the left of the slider will only be visible while the Content Browser is processing a command, e.g., if it’s scanning new directories or performing a search. Clicking on this animated icon will halt any scans or thumbnail generation that is actively taking place. Use the slider to adjust the size of the icons displayed in the Content Browser’s content windows. Clicking directly on the big or small icon will automatically adjust the size of the icons to biggest or smallest, respectively.
The concept of Drag & drop has been pushed to the limits in the Content Browser. Just about any item can be dragged into a corresponding Manager. As shown in the image below, the cursor will change if a particular Drag & drop function is not possible.
 Left, no; right, yes.
Files or presets can be relocated by dragging and dropping them into the target folder. By simultaneously pressing
Items can be moved from one hard drive or preset library to another by simultaneously pressing the
In most cases, it will suffice to simply drag the scene or preset into the editor. Its components will be allocated accordingly (no claim to the completeness of the following list can be made):
- Scenes can be opened by dragging them directly into the editor view.
- The presets for objects, materials, tags, render settings, shaders and post effects can all be added to a scene by dragging them directly into the editor view. If a shader preset is added, a material with a shader assigned to its color channel will be generated. In the case of a tag preset, a Null Object, assigned to the tag, will be generated.
- Bitmaps, videos, material presets and tag presets can be dragged directly onto an object. In doing this, materials and tags will be generated and assigned accordingly.
- If you drag a bitmap or a video into the Material Manager, a material with this bitmap or video in its color channel will automatically be created.
- If you drag a scene into the Material Manager, only the materials contained in the scene will be added to the existing materials.
- In turn, materials in the image preview can be dragged into the Presets / User folder in order to generate a material preset.
Bitmaps of materials that contain bitmap textures will also be copied to the corresponding library (into a tex directory). The paths in the material channel will be "rerouted" accordingly. If you press the Alt key while copying a material, NO bitmaps will be copied!

Texture Area (Material Channel):
- Bitmaps, videos and shader presets can be loaded by dragging them directly into the Material Channel.
- In turn, the texture preview image can be dragged into the Presets / User folder in order to create a shader preset (any bitmaps loaded must lie in Cinema 4D’s search path).
- A scene dragged into the Object Manager will be merged with the active scene.
- Objects, materials, bitmaps, videos, material presets and tag presets can be dragged directly into the Object Manager or onto an object. Materials and Material tags will be generated, if necessary.
- A tag preset that is dragged into the Object Manager will be assigned a Null Object, that will be generated automatically. A tag preset can also be assigned to an object in the editor view or in the Object Manager.
- In turn, objects or tags can be dragged from the Object Manager into the Presets / User folder in order to create the corresponding presets.
- The render preset can be dragged onto the Render Settings … window to replace these render settings.
- In turn, the settings from the Render Settings … window can be dragged into the Content Browser’s User folder in order to save them there.
- The two aforementioned methods also apply to Post Effects in the Effects tab.
Naturally, you can Drag & drop files onto your hard drive. By simultaneously pressing
Double-clicking on an item’s preview image will open the file or item using its native application.
- Sorting, view and icon size are saved individually by directory.
- Navigating with the cursor buttons within directories: Within the tree directory itself, the left and right mouse buttons can be used to navigate within the hierarchies. The Pos1, End, Page Up and Page Down keys are also supported and can be used to speed up navigation greatly when navigating within extensive tree directories.
Content Browser-specific files such as *.lib4d (libraries, e.g., presets) and *.cat4d (catalogs) can be opened in the Content Browser via the Cinema 4D Open Project command. Such items can also be placed into Cinema 4D per drag & drop.