Cinema 4D Commandline Installation
There are two ways to install Cinema 4D:
- The ‘auto’ installer that loads all components from the Internet during runtime.
By default, the auto installer has a reduced UI and is not interactive unless a dialog window appears to inform the user of an issue, most often to make a ‘yes / no’ choice. The auto installer requires Internet access in order to download the files it will install. After successful installation, the auto installer will launch the Cinema 4D version it has installed (you simply double-click the installer icon and then let it run). - The ‘full’ installer that comes with all components already included.
By default, this installer has an interactive dialog-based GUI that the user must interact with to install the product, with at least the install path appearing as a configurable option. It contains all files needed to install the product. No Internet connection is required. After successful installation, a final dialog window appears from which you can launch the product or not. You can then click on the Finish button to end the installation process.
There is an additional method for running the full installer: You can use the operating system’s command line to execute the installer application. By doing so you can also add optional parameters, if desired.
For example, a command line installation (CLI) can be used to install Cinema 4D simultaneously on multiple computers using remote applications. This is done most easily when all computers have the same user and the same password, and the application is installed to the same location on every machine.
Note that respective rights need to be set up for remote access and for the installation on the computers.
The CLI could also be used to install the Team Render Client on ‘headless’ computers. The installation process is almost completely automated and requires no additional interactivity. A user interface on the remote computer is not absolutely necessary.
This document describes how to call the CLI as well as all the various parameters that are possible by doing so.
If you are not an expert in using the command line, this type of installation should be done by someone knowledgeable in the field or an expert who is familiar with all necessary steps.
Differences between macOS and Windows
File paths are system-specific. In the following you will find two examples that are applied to the subsequent explanations.
macOS file path:
/Users/<Username>/Desktop/Cinema 4D Full Installer
Windows file path:

For macOS:
- Apple screensharing
- TeamViewer
For Windows:
- Remote Desktop
- TeamViewer
- Psexec (the installation package must already be present on the remote PC): Example command:

In the Finder (macOS) or Explorer (Windows), open the directory where the installer application is located.
First - and this is important! - open the downloaded DMG and copy the .app into a directory you can access in a Terminal (e.g., the user’s desktop).
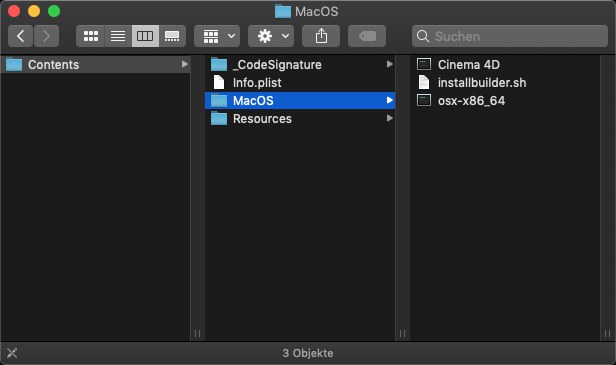
Right-click on the Cinema 4D Full Installer file and select Show Package Content from the context menu. Move to the Contents > macOS directory. Its content will look as follows:

Open the Terminal by either entering ‘terminal’ in the search function or by opening the application under Programs > System Programs > Terminal.
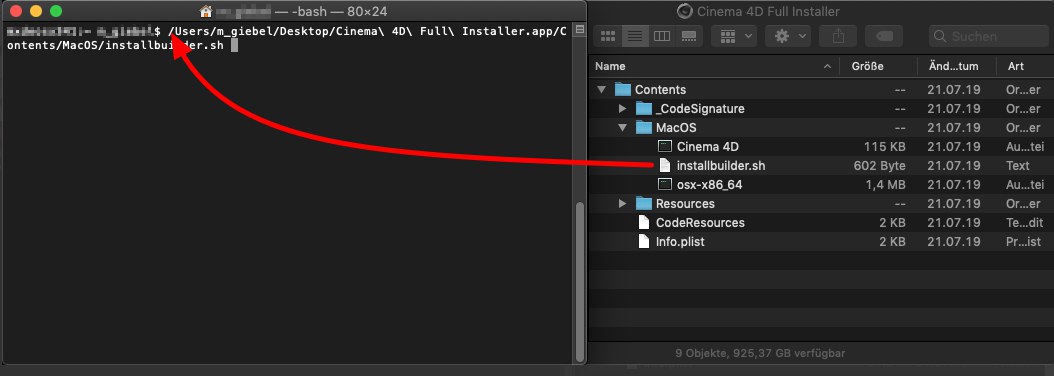
To enter CLI parameters, drag the installbuilder.sh file into the console window (alternatively you can enter the file’s path manually). A space character should follow the path to separate the path from the parameters.

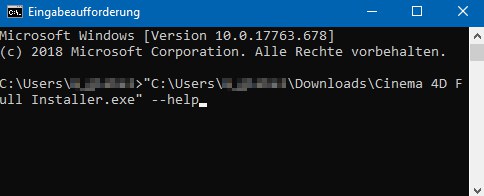
Open the console by right-clicking the Windows Start button and selecting Run from the context menu. In the dialog, enter ‘cmd’ and press Enter (alternatively you can use the Windows search function. Enter ‘cmd’ to have Windows find the console application for you).
To enter CLI parameters, drag the executable Cinema 4D Full Installer.exe file into the console window (alternatively you can enter the file’s path manually). A space character should always follow to separate the path from the parameters.

- Every parameter you enter must be introduced by a double hyphen ‘--’; the parameter’s name follows directly afterward (no space).
- An option must be separated from its parameter by a space.
- All parameters that should be executed sequentially must be separated by a space.
This parameter shows a list of all available commands.
This parameter shows some product version information. This might be helpful in case you need to contact Maxon support.
This parameter is used to set a different installation location from the default path.
If the path contains spaces it needs to be enclosed in double quotes (see examples below)
Default on macOS:
/Programs/Maxon Cinema 4D <Rel.-Number>
Default on Windows:
C:\Programs\Maxon Cinema 4D <Rel.-Number>
This parameter sets the state of the installer’s user interface if the mode (see below) has been set to ‘unattended’.
Options:
- none There is absolutely no interaction with the user, no dialogs will be displayed. Use this for 'silent' installations.
- minimal There is some interaction with the user. We do not recommend this option due to the lack of potential error dialogs.
- minimalWithDialogs Some user information will be shown (e.g., 'Cinema 4D is already running', etc.).
Default:
minimalWithDialogs
This parameter sets the installation mode.
Options on macOS:
osx
This option shows the user interface (dialogs, etc.).
unattended
Here, no user interface will appear. Use this for silent installations.
Options on Windows:
win32
This option shows the user interface (dialogs, etc.).
unattended
Here, no user interface will appear. Use this for silent installations.
Default on macOS:
osx
Default on Windows:
win32
--installer-language <Language shortcut>
This parameter sets the language of the installer’s user interface.
Options
ar, es_AR, az, pt_BR, bg, ca, zh_CN, cs, cy, da, de, el, en, es, et, eu, fa, fi, fr, he, hr, hu, id, it, ja, kk, ko, lt, lv, nl, no, pl, pt, ro, ru, sk, sl, sr, sq, sv, th, tk, tr, zh_TW, va, vi
Default: Language of your operating system if available, ‘en’ otherwise.
Completely invisible/silent installation (macOS):
Cinema 4D Full Installer.app/Contents/macOS/installbuilder.sh --mode unattended --unattendedmodeui none
Installation to a different folder and have the installer language set to Simplified Chinese (Windows):
Cinema 4D Full Installer.exe --prefix "D:\Graphics\Maxon\My C4D Folder" --installer-language zh_CN
De-Installation (Windows only)
The following parameters are available for the uninstall application that is located in the Cinema 4D installation folder. Please see above for a description.
--help
--version
--mode <Mode>
--installer-language <Language shortcut>
When the installer copies Cinema 4D onto your hard disk it writes one or more log files. Such a log file contains all occurences during an installation, e.g.. the creation of a new folder, copying files, and in case something could not be installed, error messages. In case something goes wrong during an installation it is a good idea to have a look at these files:
/tmp/bitrock_installer.log
/tmp/bitrock_installer_<Number>.log
Under Windows you will find the log files here:
C:\Users\<Username>\AppData\Local\Temp\bitrock_installer.log
C:\Users\<Username>\AppData\Local\Temp\bitrock_installer_<Number>.log