Options
If you want to quickly and easily rename multiple items (without using presets), use the Apply to function in the Replace menu. Simple define the Apply To setting at the top of the menu accordingly
With the introduction of Cinema 4D R17, the Naming tool can be used to rename tag, material, layer and Take names. Select the item you want to rename in the respective Manager. This pre-selected the items the Naming tool should affect.
Use the tool’s menu to define which Cinema 4D elements the Naming tool should affect.
Here you'll find a list of all the presets you've created. Simply choose the preset whose names you want to apply.
Use this function to create a new naming preset. The currently selected items will be used as a basis (in consideration of the Apply to setting). Hierarchical structures (e.g., for objects, Takes or layers) will be assumed.
To test this button, use the joint tool to create a chain with five joints. It doesn't matter where you place the joints. Rename the joints to Hip, Knee, Foot, Ball and Toe. Make sure that Apply to is set to Objects Click on the Add button and enter leg for the name. Your leg preset is now ready to use for naming any new legs you create.
Removes the currently selected preset. A dialog appears to request confirmation that you really want to delete the preset.
You'll see an Open dialog appear when you click this button. Use the dialog to load any presets you've saved on your hard drive. The loaded presets will appear in the Type list. You can also use this button to load presets received from other users.
Opens a Save dialog, which you can use to save the selected preset to your hard drive. This also allows you to share your presets with other users.
Here you have the option to define a prefix to be used in addition to the names in the preset. For example, suppose you want to use your leg preset to rename a left leg you've just created. Enter the text L_ as the Prefix and click Apply Name. The five joints in your new leg are now named L_Hip, L_Knee and so on.
Here you have the option to define a postfix to be used in addition to the names in the preset. For example, suppose you want to use your leg preset to rename a left leg you've just created. Enter the text _L as the Postfix and click Apply Name. The five joints in your new leg are now named Hip_L, Knee_L and so on.
Renames the hierarchy selected in the Object Manager using the names in the preset (defined by Type) and the Prefix and Postfix. This renames all objects whose hierarchy is matched in the preset. Other objects' names remain unchanged.
![]() Replace
Replace
These settings allow you to add a prefix or postfix to a hierarchy that has already been named. You can also replace parts of a name with other text.
Here you can enter a prefix that is added to the objects' names in the selected hierarchy. For example, suppose you forgot to enter a prefix when using your leg preset. You can add the prefix now using this field.
Here you can enter a postfix that is added to the objects' names in the selected hierarchy. For example, suppose you forgot to enter a postfix when using your leg preset. You can add the postfix now using this field.
Suppose, when creating a right leg, you accidentally added L_ as a prefix to each joint's name. Here you can quickly correct the names. Simply enter L_ into this field. When you click Replace Name, the text in this field is replaced for each object name in the selected hierarchy with the text entered in the With field.
Here you can enter the text you want to replace the text defined by Replace. In the case of the leg example, here you'd enter R_.
Enable this option to switch on case sensitivity for the text entered in the Replace field. For example, suppose you have a hierarchy where the name RArm appears and should be renamed to LArm. In this case, the option must be enabled, otherwise you'll get the result LaLm.
Applies the renaming defined by the settings in this group to the hierarchy that is selected in the Object Manager.
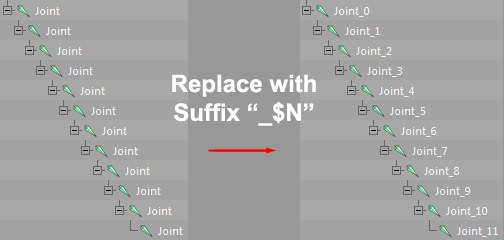
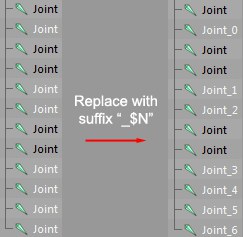
All selected objects can now be numbered automatically by using the $N string. If, for example, you want to add the suffix _$N to selected objects with the common name "Joint", the objects will be named "Joint_0", "Joint_1", etc. The objects do not have to be arranged hierarchically, they will simply be numbered sequentially in the Object Manager according to their order (the top-most object will be first and all object below will be numbered accordingly).
 Replacing the suffix of the selected Joints with _$N produces the numbering seen here.
 Only selected objects will be renamed. This also works on objects that are not parented.