Jobs Page
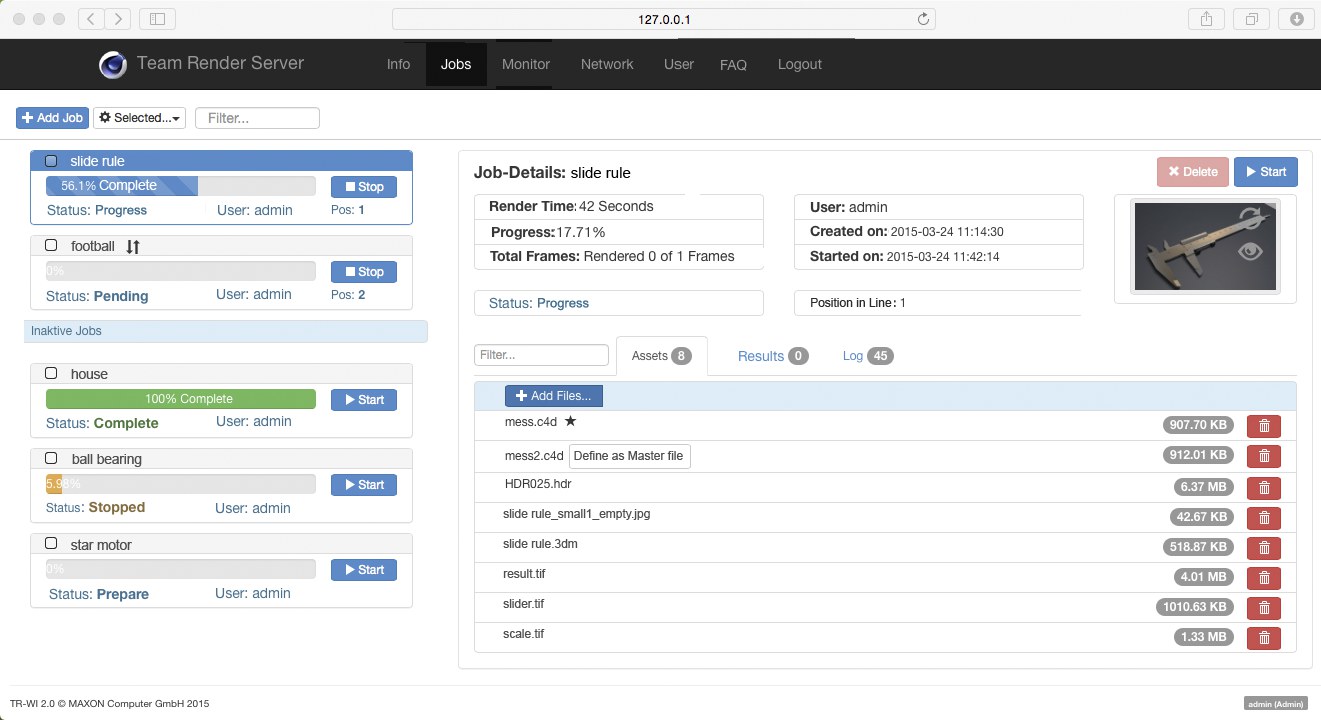
The Jobs page is where everything takes place. Here you can create or delete jobs upload Project files and download the results, change job priorities and more.

The jobs column on the left displays all jobs that have been set up. Status information and options are displayed for each job:

- At the top left, next to the job name, you will see the drop-down menu Selected, from which one or all jobs can be selected if you want to apply a command to multiple jobs at the same time.
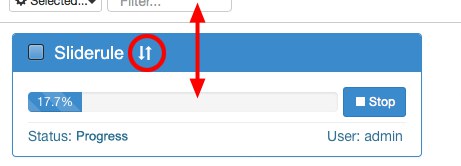
- To the right of the job name are two arrows. These can be used to change a job’s priority if multiple jobs are running. If you want to give a particular job top priority, drag it to the top of the list. Note that the job currently being run will be Stopped (for animations, no frames will be lost; for stills, what was rendered to that point will be lost).
Note that only 1 job can be rendered simultaneously (but multiple jobs can be started). - The progress bar below the job’s name will be green if the job is Complete, blue while it’s being Prepared and orange if it’s been Stopped.
Alternatively you can click on the position number and enter a different existing position in the dialog window that opens (click on the check mark (or theReturn key) to confirm; click on the plus sign (or theEsc key to abort). The respective job will then be moved to this position. - At the right of the status bar is the Start/Stop button with which a job can be stared or stopped. When a job is stopped, no frames will be lost for animations; for stills, what was rendered to that point will be lost.
- The job’s status is displayed below the status bar at the left. The most common status are:
- Idle: Job has not yet been started
- Prepare: The Team Render Server is distributing the files to other render clients
- Progress: The job is being rendered
- Stopped: The job was stopped because the Stop button was pressed or because an error occured (e.g., missing assets)
- Failed: Rendering has failed completely (e.g., missing Project file)
- Idle: Job has not yet been started
- If multiple render jobs are started, their order will be displayed at the bottom center.
- The user’s name who started the job will be displayed below the status bar at the right.
Here you will fine the following commands and buttons:
Click on this button to add a new job. You will be asked to name the job. Click on OK to confirm. You can then upload one or more Project files to the Team Render Server in the Assets tab at the bottom of the right column (see also Tip for an alternative method).
This will start all selected jobs.
This will stop all selected jobs that are running.
Selected menu: Delete Selected
This will delete all selected jobs and permanently delete any rendered images/videos. You should therefore be careful when using this command. A job that is currently being rendered cannot be deleted.
If a job cannot be deleted here, the job folder in the user directory can be deleted instead (see also Tip).
Selects all jobs …
… deselect all selected jobs.
At the right of the selection menu you will find the Only my jobs option, which will only be displayed if you are logged in as an admin. Enable this option if you only want to see your jobs listed.
Here you will find several filters that filter either the Job or the Assets/Results. This is a display filter only (elements not displayed will still be included) that works in real-time. The filters can be implemented simply by typing the corresponding series of characters. Each element whose name is made up in part of the series of characters typed will be displayed. Upper and lowercase is ignored. Click on the X button on the right to clear the search bar and disable the filter function.
The right column of the Jobs page contains a wide range of information and commands for the jobs in the left column.
This starts the job. This button has the same function as the button of the same name in the left column for each job.
If you want to start unfinished (animation)jobs, Team Render Server will check which images have been rendered and will only render the missing images.
Stops the respective render job.
This deletes the job, including any images that were already rendered. If a job is currently running, it cannot be deleted.
Below the aforementioned buttons you will see information regarding the selected job. The job’s status (which is described here) is also displayed.
This is where the Project’s preview image, as defined under Preview Command, is displayed.
The following buttons are also available:
- Update: updates the image (e.g., if the Project file was changed in the user directory’s jobs folder)
- Enlarge: enlarges the image
The Job Details menu also includes a Render Info section that contains information about the mater file’s render settings. Under Image Resolution the units can be defined and the numeric value will be converted accordingly.
This tab’s options are used to upload or delete files for render jobs.
Click on this button to navigate to the file(s) you want to upload. Select the Project file, including all assets (textures, XRefs, etc.). Multiple selections are possible.
Alternatively you can select a ZIP file (up to 4 GB) that contains the Project file and all assets (the project should be saved using the ![]() Save Project with Assets...
Save Project with Assets...
All selected files will then be listed and you can upload them by clicking on the Upload button. Click on Upload All to upload all files to the Team Render Server. As long as files are being uploaded, the process can be stopped by clicking on Cancel. The upload process can be re-started at a later point, if desired.
Uploaded files can be deleted by clicking on the Delete button.
If multiple files have been uploaded, only one can be defined as a Master file (marked with a star next to it). This is the file that will be rendered. If you want to define a different file as the Master file, click on the Set as Master button next to the repsective file (see also XRef object).
How to upload files without using the browser interface is described here.
This tab displays the Team Render Server render results (which in turn come from the render clients).
If a video format was defined in the file, animation frames for the job that is currently running will initially be saved with the extension *.bp3 and subsequently converted by the Team Render Server to a video format when the render job has been completed.
If you don’t want to download each individual frame of animation, click on this button and all elements in the respective Job folder’s Results tab will be zipped and you can - as soon as the file has been zipped - download the file by clicking on the Download button. The file will be named xxx_100percent.zip, whereby xxx represents the file’s name.
The files can be unzipped as follows:
- Windows: right-click on the zip file and select Unzip All from the menu that appears.
- Mac: double-click on the zipped file.
Click on this button to delete all rendered images for the selected job. The job will be reset to its pre-rendered state, which means that the job can be restarted.
Click on this button to download the respective file. The location to which it’s saved depends on the browser and operating system (right-clicking on the button will make the corresponding browser-specific options available from which to choose).
Click on this button to delete individual files. If the job is re-started, the missing image (for stills) or the missing images (animation) will be re-rendered.
This tab displays information pertaining to the respective render job such as render start, which client is rendering which image, connection speed between Team Render Server and the clients and more.