Basic Properties
Here you can enter a name for the object.
If an element was assigned to a layer its layer color will be displayed here. This field reflects the layer color in the Layer Palette. You can drag & drop layers from the Layer Manager or similar layer fields onto this field. You can also assign layers or remove elements from current layers using the menus located behind the small triangle.
Defines how much influence the Motion Layer has. For Animation Layers, this value is the same as the slider in the Motion System tag’s animation layer list in the Attribute Manager.
Defines how the Motion Layer should be calculated:
- Using the underlying Motion Layers
- Using the underlying Animation Layers
- Using animations located directly at the affected object hierarchy
Careful: This mode works differently for Animation Layers (see below)
This is the default mode. All key values recorded in the Motion Source will be summated according to layer value.
Be careful when recording scale values! Scale values should only be used if you want to animate the scaling. Otherwise your objects will grow with each Motion Layer. This is why the recording of scale values when creating Motion Clips is disabled by default.
Relativ mode is designed to mix a Motion Clip on a Motion Layer with the original animation of a given object. When in this mode, the animation in the Motion Clip’s Motion Source will be mixed with a given object’s original animation. This only works if the original object’s corresponding animation tracks are present.
When in this mode, the current animation will overwrite all animations on the underlying layers, both Motion and Animation Layers, to the value defined.
Here you can define the mode in which an Animation Layer’s animation should be recorded. Relative means that the animation will be recorded in an offset to the "Default Layer" animation. The layers’ summated coordinate values yield the actual coordinates of the affected objects. If the "Default Layer" animation is modified, this yield will be modified accordingly.
If, on the other hand, Absolute mode is selected, the objects’ coordinates will be recorded as they are. No comparison with the underlying layers will occur. Modifying recorded coordinates in underlying layers will have no effect.
The setup for this mode is the same as for the Mode Icon in the Motion System tag’s animation layer list in the Attribute Manager. Decide in advance which mode you want to use. Subsequently changing the mode will generally lead to unwanted results. Changing modes is possible but you should be aware of the following before doing so:
In "Relative" mode, only the offset to the other layers will be recorded. If, for example, an object was located at a Y-position of "200" and was moved on an Animation Layer in "Relative" mode to a Y-position of "210" for a single keyframe, the Y-position on that Animation Layer will have recorded a Y-position value of "10", i.e., only the difference between the two values.
This problem becomes even clearer when scaling keyframes: If, on a given Animation Layer, you record keyframes for the scaling of an object but do not animate this, values of "0" will be generated for all axes because there will be no difference between the previous and current scaling. If you now switch to "Absolute" mode your object will disappear because its scaling for all axes will be set to "0".
Lets you turn Motion or Animation Layers on or off. This is the same as clicking the Animation Icon in the Timeline when in Motion mode or, for Animation Layers, clicking the Animation Icon in the Motion System tag’s animation layer list in the Attribute Manager.
Lets you define whether or not only the current animation should be displayed on the Motion or Animation Layer. No other layer will be evaluated as long as this option is enabled.

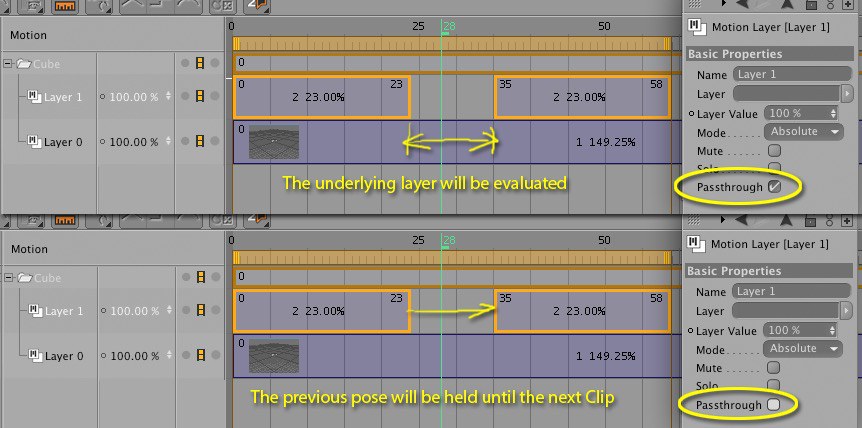
This option is for dealing with gaps between Motion Clips. If enabled a Motion Clip’s last value will be retained until a new Clip offers a new value. If, for example, Mode is set to Absolute the end pose of the first Motion Clip will, in the event of a gap, be retained until the second Motion Clip is reached. Animations on underlying layers will not be overwritten when a layer is actually empty. If, however, the Passthrough option is enabled, the underlying animation will be evaluated during the gap between two Motion Clips.
Lets you make the Animation Layer the active Animation Layer. Any keyframes created will now be placed on this Animation Layer.
Use this option to enable or disable Quaternion interpolation for animation layers (see also Quaternion Rotation).