Options
Into this link field, Drag & drop the joint that should mirror the selected Joint. This means that if you've previously mirrored a chain of Joints to the other side and you now want to edit one of the Joints, you don't have to delete the Joints on the opposite side then remirror them.
Re-mirroring in this way requires extra effort because the Expressions have to be adapted. The Target field saves you from this extra effort by enabling you to change one side of a character's joints and have it mirrored over to the existing other side.
Will duplicate the selected objects and apply the Mirror command.
The object linked in the Object field will become the target of the Mirror command. This object will be placed as a mirror of the currently selected object.
Will mirror the selected object, without creating a copy.
The link field used to link objects to be mirrored. Will only become active when the Target mode is set to Object.
Will mirror any object that is linked to a tag attached to an object being mirrored. This is very useful to mirror IK goals along with the IK tags, for example. All mirrored linked objects will be placed into the mirrored tags.
Will mirror a joint (or joint hierarchy) and automatically set the mirrored joint as a symmetry of the original one, by enabling the Symmetry option found in the Symmetry tab of each joint, and referencing the original joint as its mirror source.
Enabling this option will keep the mirrored object's coordinates identical to their values before mirroring. This option makes use of the Freeze Transformations and is a great way to keep your expressions and customized setups working the way they should.
For example, let's says that you have created an expression driven by the rotation of a joint. When mirroring a joint, its coordinates will change, hence affecting the way your expression is going to behave. By enabling this option when mirroring, your joint will keep the same coordinates and you won't have to change any values in your expression to have it behave the same as before.
![]() Properties
Properties
Enable this option if you want the tool to transfer positions. For example, you can use this option to transfer changes made to positions on one side of a character over to the corresponding hierarchy on the other side.
This type of mirrored behavior is also possible using the Symmetry tab in the joint objects themselves. However, the advantage of the option here in the mirror tool is that, unlike joints, you don't have to set up the symmetry manually.
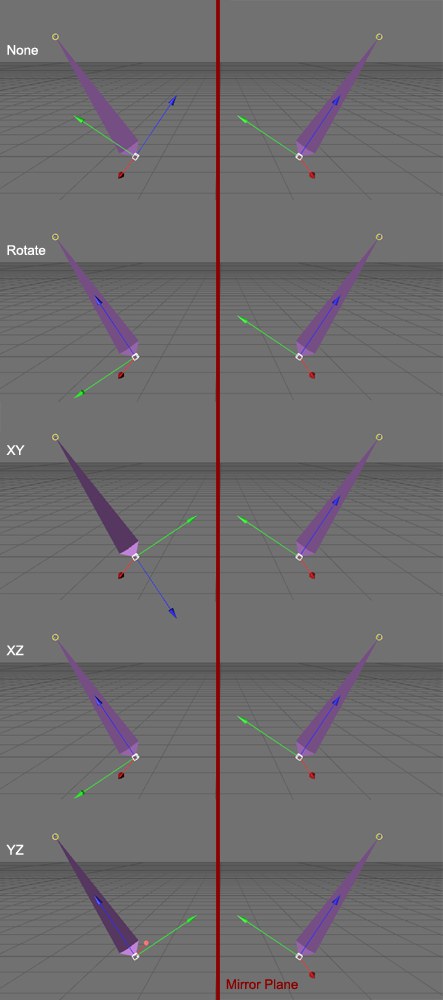
 Various axes modes (each mirrored from right to left).
Use this setting to define which axes will be mirrored, and which one will simply be rotated.
The axis will not be mirrored. The axis orientation of the original and mirrored objects remain unchanged.
Rotation will take place around the primary axis (for joints this is the Z axis by default. This can be changed in the Object tab of each joint).
The joint’s selected axis system will be mirrored. For example, if XY is selected, then both the X and Y axes will be mirrored. The Z axis will be rotated to accommodate this mirroring.
Includes the selected object's weights in the mirror transfer. Note that weights can be mirrored for selected points only if you have an active points selection on the mesh.
Will only mirror the points of a polygonal object, leaving its axis unaffected. Can be used with the Position option disabled, and target set to Self (to move the points) or Clone (to duplicate the points), for example.
![]() Clone
Clone
Includes the selected object's tags in the mirror transfer. Note that this will also mirror Pose Morph targets.
Includes the selected object's animation keyframes in the mirror transfer.