![]() Planar Constraint
Planar Constraint
Planar Constraint
This tag works only after 3D features have been created, i.e., a 3D reconstruction has taken place.
Using this tag, 3 or more Tracks/features can be selected that can be used to define a plane (e.g., the floor or, for an Object Tracker, a layer to be replaced) within the vertex cluster. Since this plane will most often correspond to a layer in the world coordinate system you can also define the world axis to which the plane should lie perpendicularly.
The tag can be used as follows for calibration (3 methods):
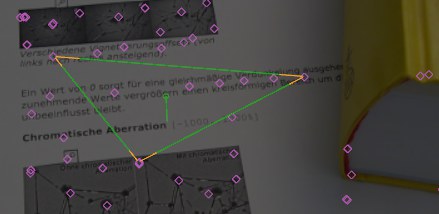
- Create the tag for the respective Motion/Object Tracker object. A triangle will appear at the center of the Viewport. Drag each of the triangle’s three corner points to a Track or feature that lies on one of the planes:

Make sure that the points do not lie to closely together and that the triangle they create is as extensive as possible. As soon a the axis is defined in the tag’s Axis setting (e.g, Y for the floor) the triangle will be colored accordingly and the vertex cluster, including the camera, will be re-oriented so that all 3 features lie on the corresponding axis plane.
- With
 3D View
Shift andCmd/Ctrl can be used to add or remove selections). A median plane will be calculated using the selected features and a square preview will be displayed that will be colored according to the axis that was defined. Using this method, errors for only three Tracks/features can be minimized. The deviance of each feature to the median plane will be displayed, which makes it possible for you to delete the largest deviations: - Select the Create Planar Constraint tool (main menu:
) and click on three Tracks that lie on a given plane. A Planar Constraint tag with linked features that match the Tracks will automatically be created.

This command creates a Planar Constraint tag with corresponding links to the features (see above).