Basic Properties
Here you can enter a name for the object.
Lets you name/rename a Motion Clip. Note that the name displayed in a Motion Clip is the name of the Motion Source linked to it and not the name of the Motion Clip itself. In the "Motion View … " dialog window (Timeline menu: Motion System) you can define which name, if any, should be displayed.
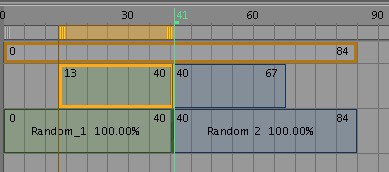
Defines the color in which the Motion Clip will be displayed in the Timeline. If the Show Ghost option is enabled, that Clip’s ghosts will also be displayed in the color defined.
Note that the Track Color setting should NOT be set to No Color in the Preferences menu.
If enabled, this Clip can no longer be activated or moved in the Timeline. In addition, no changes can be made to this Clip in the Attribute Manager until this option is again disabled.
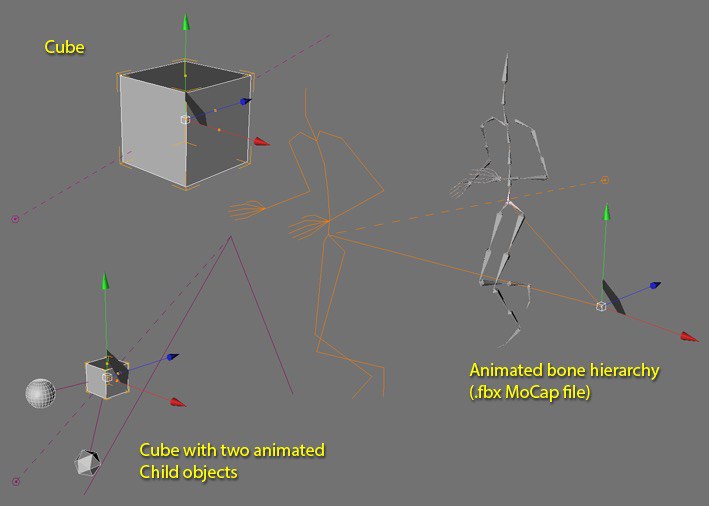
If enabled, a dashed line (in the color defined for that Clip) will be displayed in the Viewport between the start and end position of that Clip. The start position will be denoted by a hexagon. Furthermore, two solid lines will be drawn for each Child object within an object hierarchy - one for the current frame (if the frame does not lie outside of the actual Motion Clip) and one for the last frame within the Clip. Ghosting is very helpful when accurately placing multiple clips end-to-end.
Lets a Motion Clip be linked to a Motion Source. Normally the Motion Source that is automatically generated when the Motion Clip is created is placed here. Since Motion Source can also be saved externally, this option lets you use such a Motion Source for a given Motion Clip. Of course this Motion Source should match the Motion Clip’s object hierarchy. Otherwise the resulting animation most likely be very flawed.
Defines the Motion Clip’s start frame. The same can be done by moving the Motion Clip’s orange handle in the Timeline. Note that changing the start frame will not affect the content of the Motion Clip.
Defines the Motion Clip’s end frame. The same can be done by moving the Motion Clip’s orange handle in the Timeline. The Motion Clip’s last frame will always be displayed as the End frame with no looping.
Define how often a Motion Clip’s animation should be looped. The Motion Clip will be extended accordingly.
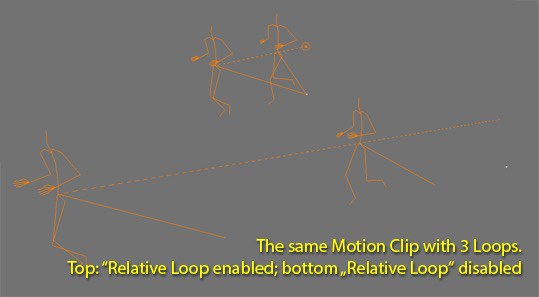
Enable this option if you want the looping to take place with a relative offset. If, for example, the Motion Source contains a walk cycle, this option can be used to make the character walk in a straight line indefinitely.
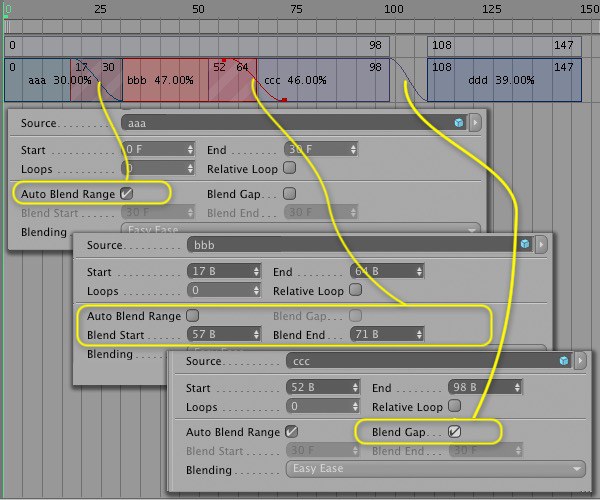
Two Motion Clips must lie on the same Motion Layer before they can be blended with each other.
Drag a Motion Source onto an existing Motion Layer to create a new Motion Clip on this layer. To move a Motion Clip over another Motion Clip, press the
When mixing two Motion Clips, always use the parameters for the proceeding Motion Clip, i.e., the one to the left, for creating the blend.
If enabled, the overlapping region of two Motion Clips on the same Motion Layer in the Timeline will be blended automatically. The blend will begin at the first frame of the overlapping region and end at the last frame of the overlapping region. Blending will create a smooth transition form one Motion Clip’s animation to the other. A curve will be displayed in the overlapping region that represents the blending process.
If you prefer to define the blending region manually, disable this option. As is also the case with all other blending options, this option blends the selected Motion Clip with the Motion Clip that follows it in the Timeline.
Using this option, two Motion Clips can be blended automatically, even if they do not overlap and lie several frames apart in the Timeline. The gap between the Motion Clips will be filled by blending the last frame of the proceeding Motion Clip with the first frame of the following Motion Clip.
Lets you manually define the frame at which the blend between the selected Motion Clip and the next Motion Clip should begin. You are not restricted to the range within which the Motion Clips overlap - the blending can also be set to begin prior to the overlapping region. Alternatively, the blend start can be defined interactively in the Timeline by dragging the blend curve’s top-most grabber.
The Auto Blend Range option must be disabled in order to use this option.
Lets you manually define the frame at which the blend between the selected Motion Clip and the next Motion Clip should end. You are not restricted to the range within which the Motion Clips overlap - the blending can also be set to end after the overlapping region, allowing you to manually fill a gap between Motion Clips, if necessary.
Alternatively, the blend end can be defined interactively in the Timeline by dragging the blend curve’s top-most grabber.
The Auto Blend Range option must be disabled in order to use this option.
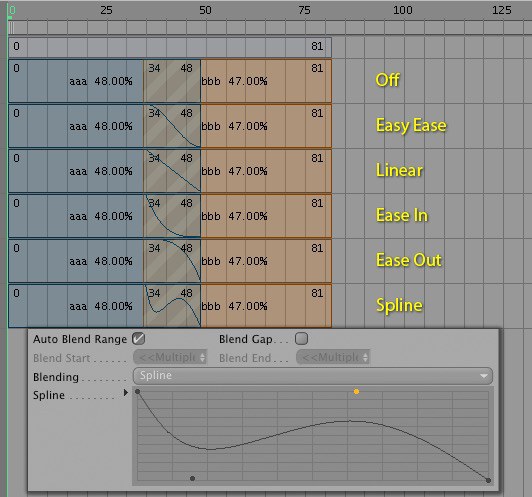
Defines how Motion Clips should be blended. For the most part, these options reflect those for defining the interpolation between Keyframes. The blend curve in the Timeline represents the corresponding selected method. You can select from:
No blending will take place. The first Motion Clip that overlaps the next will be played until its end, at which point the second Motion Clip will be played.
The blending will begin and end smoothly. This is the default setting.
A linear blend between the two Motion Clips will result.
The blend will begin quickly and end slowly.
The blend will begin slowly and end quickly.
If selected, a spline curve will be made available in the Attribute Manager with which the blending can be defined manually.
If Blending is set to Spline, this spline curve will let you manually define the blending between the selected Motion Clip and the next Motion Clip.