Record
As nice as it is to be able to wander through your 3D scene it would be even nicer if this journey could be recorded or the path walked saved as a spline for other uses. Well, this is exactly what you can do using the Record Movement tab. Although your walkthrough makes an impressive visual statement, all you are really doing is moving a single virtual camera through your scene. This camera can be transformed into a normal, animated Cinema 4D camera.
You have several options to choose from (depending on what your end result should be):
- The path of movement and the angle of view (incl. camera focal width) will be cached internally (in the following called virtual camera animation) in order to allow the following two steps to be taken: - Write Recorded Movement Into Splines menu: Automatically creates a spline of the motion path and the camera’s angle of view. A completely animated camera can also be generated. The camera’s focal width will not be taken into consideration.
- Write Recorded Movement Into Camera menu: The camera’s motion path and angle of view is saved as an animated position and rotation track camera. The camera’s focal width will be included.
- A camera’s motion path, angle of view and focal width will be recorded directly to the corresponding animation tracks, without being cached. The camera’s focal width will be included here also.
As soon as you have cached a camera movement (i.e. a virtual camera animation) it can be played back using this slider. 0% represents the beginning of the animation and 100% the end.
Since this is a virtual camera animation the Timeslider in the Animation Toolbar will not work in conjunction with this playback. The virtual camera animation will be cached together with the entire scene.
You can also overwrite any part of the virtual animation. Simply set the slider to 50%, for example, and start recording a new movement. This new movement will overwrite the previous animation starting at the 50% mark.
2nd Pass Recording - Rotation Only
Use this option if you only want to record the camera’s movement with regard to position and angle of view. Complex camera movements and angles of view are difficult to record simultaneously.
Virtual Walkthrough lets you record the camera’s position animation and angle of view animation separately. After the position animation has been recorded it can be played back and the angle of view animation added simultaneously.
This is how it’s done:
- Make sure that the 2nd Pass Recording – Rotation Only has been deactivated. Next, click on the top Start Recording button (use the top button, not the button of the same name at the bottom).
- Walk through your scene. When done, click on the Stop Recording button. If you move the Movement Progress slider you will see the camera’s position and angle of view movement (the latter was also recorded but will be overwritten in the next step).
- Set Movement Progress to 0%, activate 2nd Pass Recording – Rotation Only and click on Start Recording again.
- Move your cursor to the editor view and press and hold the left mouse button. As long as you press the mouse button the previously recorded position animation will play. While still pressing the mouse button, the mouse can be moved and thereby change the angle of view.
- You can release the mouse button at any time and press the Stop Recording button to stop recording the angle of view animation. Once you have stopped recording you can drag the Movement Progress slider to view the angle of view animation.
You can change the Movement Progress slider at any time (which will interrupt the recording process) and press the Start Recording button again (which will overwrite the remaining animation).
Use this option to reset (delete) the virtual camera animation.
Starts recording the virtual camera animation. Recording will start at the point defined by the Movement Progress setting. A new animation will start at 0 and an existing animation can be overwritten starting at any point defined (e.g., 80%).
A red icon will be displayed a the bottom right of the viewport during the recording process. This red icon can be disabled in the HUD tab.
Press this button to stop the recording process.
![]() Write Recorded Movement Into Splines
Write Recorded Movement Into Splines
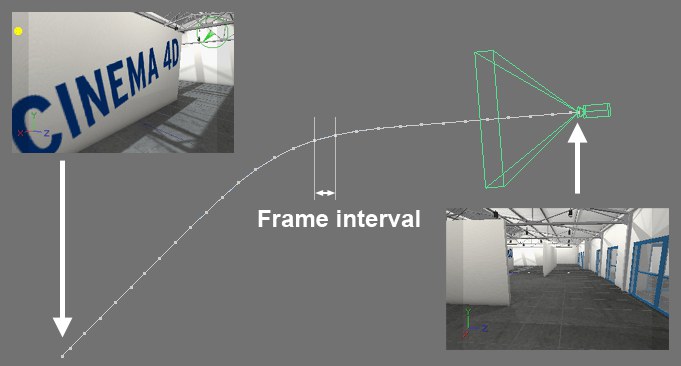
 A camera animation and its angle of view, shown as two splines (they lie more or less in the same position).
Use this menu to make virtual camera animations and / or the movement path visible via a spline.
Two splines will be created:
- Spline Object: The camera’s motion path.
- Spline Object Target: The camera’s angle of view.
Both splines will lie more or less one over the other. They are, though, slightly offset. The offset is necessary so the camera and an automatically created Null Object (Camera.Target – which runs slightly ahead of the camera) can be animated along these splines using the Align to Spline and Align expressions (which can be created automatically).
Camera zooms cannot be reproduced by the splines during recording. Camera zooms must be animated manually or the sub tab’s settings Write Recorded Movement into Splines or Write Recorded Movement into Camera can be used (these settings animate camera parameters only, including focal width).
Use this setting to define the frame spacing along the spline. The greater the value, the greater the distance between points. Avoid using very large values since this will greatly reduce the motion path’s accuracy.
After a virtual camera animation has been created two splines can be created by clicking on this button:
- Spline Object: The camera’s motion path.
- Spline Object Target: The camera’s angle of view.
However, this will not create a camera or tags. This is done using the Create Ready Camera button, described below). The blank splines can be used to, for example, animate other objects along them using the Align to Spline expression. Even a light can be animated along these paths.
Camera First Frame [0..10000]
Camera Last Frame [0..10000]
Use these settings to define which range of a finished animation that is ready to be generated via splines should be played.
The following applies:
- Camera First Frame: Movement Progress = 0% of the virtual camera animation.
- Camera Last Frame: Movement Progress = 100% of the virtual camera animation
The Align to Spline tag’s start and end Position parameters will be set to these times.
See also: Create Ready Camera (below) which has the same function with the exception that a new camera will not be assigned tags or splines. Only the target camera that is manually placed into the Camera Auto Setup field will be assigned tags or splines. This lets you edit existing target cameras.
Click on this button if a virtual camera animation has been created to create the following linked objects and tags:
- A new camera, incl. animated Align to Spline expression (refers to Spline Object) and Align tag (refers to Camera.Target).
- A Null Object named Camera.Target, incl. a Align to Spline expression (refers to Spline.Target object).
- Spline Object: The camera’s motion path.
- Spline Object Target: The camera’s angle of view.
You now have a camera that has been animated using splines. All you have to do now is place it into your view (View: Cameras / Use Camera / Default Cameras). The length of the animation and when it starts and ends is defined by the Camera First Frame / Camera Last Frame settings.
The virtual camera animation will still exist.
![]() Write Recorded Movement Into Camera
Write Recorded Movement Into Camera
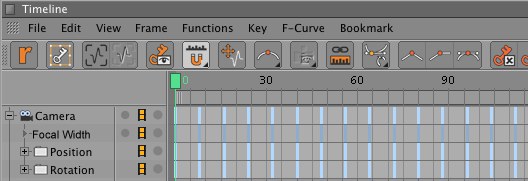
 A camera animation using camera keys.
Contrary to the functionalities described above, the camera’s position and angle of view animations are made using the settings described below via a camera parameter animation and not via splines. This bears the advantage that camera zooms created using the animated camera focal width parameter will be taken into account.
Furthermore, the animation can be created as a slow motion or time-lapse animation using the Time Adjustment setting.
Click on Create Ready Camera to define the frame interval at which a key should be generated. Enter 10, for example, to generate keys at every 10th frame for focal width, position and rotation, respectively.
Use this setting to temporally compress (time-lapse = values less than 1) or extend (slow motion = values greater than 1) a keyframed virtual camera animation.
As soon as you click this button the virtual camera animation will be transformed into a real camera animation with keys for position, rotation and focal width tracks.
This camera can then be selected in the viewport (viewport menu: Cameras / Use Camera) and be output as an animation.
The virtual camera animation will still be cached!
![]() Record Movement Directly Into Camera
Record Movement Directly Into Camera
This is the third method with which you can turn a walkthrough into an animation. In the methods described above a virtual camera animation was first created and subsequently assigned to a real camera.
Using this method, a camera, defined in the Camera Link setting, will be animated directly. This camera can be linked to the view, if desired.
Drag a camera you would like to link into this field. Position, rotation and focal width keys will automatically be added as soon as you click on Start Recording (at bottom).
A camera can be selected in the viewport via the Cameras / Use Camera menu.
Use this setting to navigate within the recorded camera animation. A value of 0% represents the start of the animation (Start Recording) and a value of 100% represents the end of the animation (Stop Recording).
Note that the Animation Toolbar’s and Timeline’s Timeslider have no effect on this recording. Although the Timeslider can be used to play the animation, the Movement Progress slider must be used to move to a time in the animation for editing.
Use this setting to define the interval between camera keys.
Use this setting to compress (time-lapse = values less than 1) or extend (slow motion = values greater than 1) a keyframe animation.
Starts recording the camera animation. Recording will start at the point defined by the Movement Progress setting. A new animation will start at 0 and an existing animation can be overwritten starting at any point defined (e.g., 80%).
A red icon will be displayed a the bottom right of the viewport during the recording process. This red icon can be disabled in the HUD tab.
Press this button to stop the recording process. The first camera keys will have been created.