X-Particles and Cycles 4D: Rendering Smoke
This brief tutorial consists of three pages:
- Rendering Smoke
- Rendering Fire
- Combining Smoke and Fire
Cycles 4D gives very good results when rendering smoke and fire from an X-Particles simulation. Here is a short example:
(Many thanks to Mario Tran Phuc for allowing us to use his work here.)
Note that this is a quick simulation, higher-quality results are possible at the expense of longer render time.
 It is important to remember that the actual simulation is still generated by X-Particles, using the domain object. Nothing has changed in that respect, so the quality of the simulation is not affected by Cycles 4D and any existing simulations you may have will work as they did before. What Cycles 4D does is render the result, rather than using the X-Particles Gaseous material. This page shows how to render fire and smoke with Cycles 4D, but does not cover how to set up the simulation. For that, please refer to the X-Particles manual, video manual, and tutorials.
Thin Smoke
Smoke is easy to render with Cycles 4D. The scene used here is a basic X-Particles domain object using a sphere as the source object. In the first example we'll aim for a thin, wispy smoke or steam without any fire. Here's the basic scene object manager:
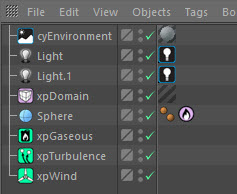
To keep the smoke nice and thin the xpGaseous modifier's Fuel Rate needs to be quite low; in this scene, 4 was a satisfactory value.
To render the smoke, we use an object material containing a Volume Scatter node and a Volume Absorption node added together with an Add Shader node. The material is then applied to the domain object. By itself this won't do much, it will just render the entire domain as a solid block. We need some way to only render the area where the smoke is and render it more densely where the smoke is densest.
We do this with a Point Density node. This is the initial node tree:
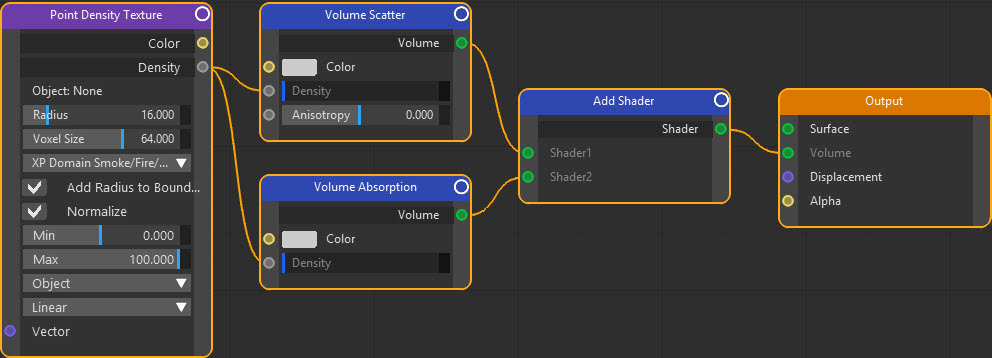
There are some important points to note here. Look at the settings in the point density node in the right-hand pane of the node editor:
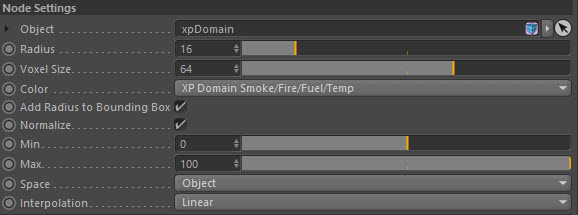
Firstly we need to tell the node where to get the data it will output. This is the domain object, so that object is dragged into the Object link field, as shown above.
Now the domain has a number of outputs we can select from the Color drop-down menu. For this purpose we'll use the XP Domain Smoke/Fire/Fuel/Temp option. This outputs a lot of data but we only need the smoke density and that is output in the Density port; therefore this is linked to the Density input ports of the two volume nodes. Now the density value is controlled by the domain smoke density.
Finally, note that the Normalize switch is checked and the Min/Max values are set to 0 and 100 respectively. These are very important settings. In the domain object, the smoke value which the domain outputs is set to be between 0 and 100:
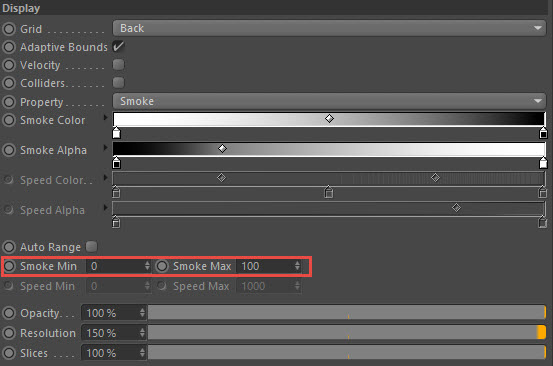
it's no coincidence that these values match. What this will do is ensure that the point density node receives a smoke value between 0 and 100 and normalizes it - that is, converts it to a value between 0 and 1. This is ideal for using as an input into the density port of the volume nodes. If Normalize was unchecked the point density node would output the value obtained from the domain.
These values have no physical meaning. You can change them to whatever you like. And you don't need to make the values match in the domain and point density node. For example, if you changed the Max value in the node to 10, any value greater than 10 received from the domain would be output as 1, instead of some value between 0.1 and 1.
If we render a frame of this now, we see something like this:
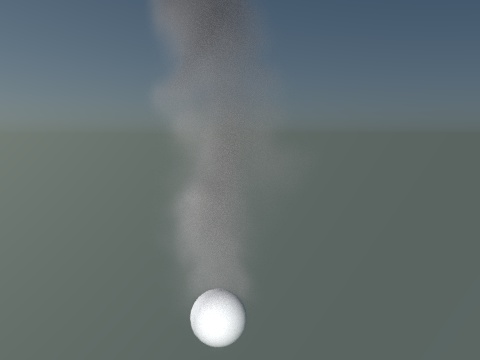
This isn't bad but it might be nice to make it even thinner. We can do this by reducing the density values using a Math multiply node. The node tree would then look like this:
The same rendered frame would look like this:
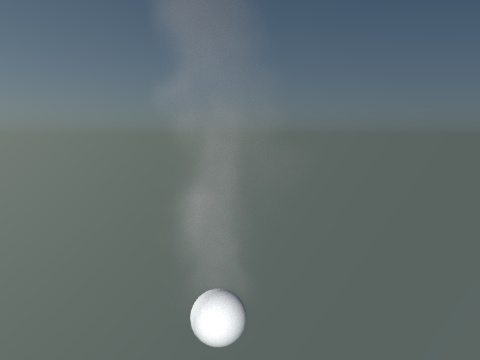
If the final animation is now rendered, we can see this, some nice wispy smoke (or steam if you prefer):
It has a slightly grainy appearance due to the low sample count, more samples will give a better result.
Thicker smoke
What if we want to do the opposite and have some really thick black smoke? That's easy. We need to do three things:
- increase the Fuel Rate in the xpGaseous modifier to a higher value (e.g. 25) to get more smoke
- increase the values in the Math multiply nodes to give denser smoke (this scene used a value of 2 to multiply the volume scatter and 100 to multiply the absorption)
- and give the smoke a darker colour than the mid-gray in the volume scatter node; here we used a Color Ramp node, driven by the density output from the point density node, but there are other ways to do this
If we do all that, then we get this result:
What about fire?
There is, as they say, no smoke without fire and rendering fire from this simulation is covered in the next page.
Files
Here are the two files used in these scenes. Feel free to experiment with them to get the results you like.

